Comment créer un calendrier mensuel ou annuel dans Excel ?
Vous devez parfois créer un calendrier spécifique pour un mois ou une année donnée dans Excel. Comment le faire rapidement ? Ce tutoriel vous dévoile des astuces simples et efficaces pour générer facilement un calendrier mensuel ou annuel directement dans Excel.
Créer un calendrier mensuel ou annuel à l’aide d’un modèle Excel
Créer un calendrier mensuel à l’aide de VBA
Créer facilement un calendrier mensuel ou annuel avec Calendrier perpétuel
Créer un calendrier mensuel ou annuel à l’aide d’un modèle Excel
Dans Excel, utilisez un modèle de calendrier pour créer facilement un calendrier mensuel ou annuel.
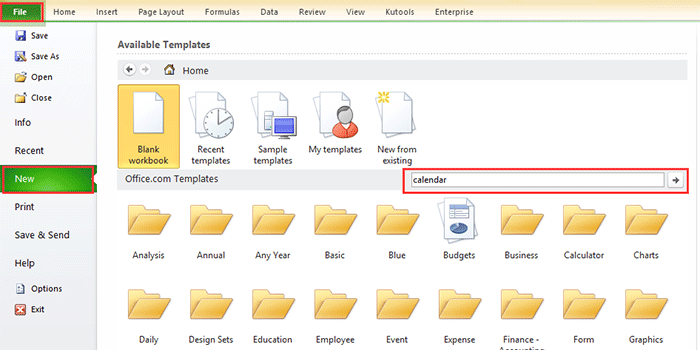
1. Dans Excel 2010/2013, cliquez sur Fichier > Nouveau. Dans Excel 2007, cliquez sur le Bouton Office > Nouveau, puis, dans la section droite de la fenêtre qui s’ouvre, saisissez calendrier dans le moteur de recherche. Voir la capture d’écran :
Dans Excel 2010/2013
Dans Excel 2007

2. Appuyez sur Entrée, puis plusieurs types de calendriers s’affichent dans la fenêtre. Sélectionnez le type de calendrier souhaité et cliquez sur Télécharger (ou Créer) dans le volet droit. Voir la capture d’écran :

Un calendrier est désormais créé dans un nouveau classeur. Voir la capture d’écran :

Créer un calendrier mensuel à l’aide de VBA
Parfois, vous avez besoin de créer un calendrier d’un seul mois pour une période précise, comme janvier 2015. Avec la méthode décrite ci-dessus, il peut être légèrement difficile de trouver un modèle correspondant. Voici donc un code VBA conçu pour vous aider à générer facilement un calendrier mensuel sur mesure.
1. Appuyez sur Alt + F11 pour ouvrir la fenêtre Microsoft Visual Basic pour Applications, cliquez sur Insertion > Module, puis copiez et collez le code VBA ci-dessous dans la fenêtre.
VBA : Créez un calendrier mensuel.
Sub CalendarMaker()
       ' Unprotect sheet if had previous calendar to prevent error.
       ActiveSheet.Protect DrawingObjects:=False, Contents:=False, _
          Scenarios:=False
       ' Prevent screen flashing while drawing calendar.
       Application.ScreenUpdating = False
       ' Set up error trapping.
       On Error GoTo MyErrorTrap
       ' Clear area a1:g14 including any previous calendar.
       Range("a1:g14").Clear
       ' Use InputBox to get desired month and year and set variable
       ' MyInput.
       MyInput = InputBox("Type in Month and year for Calendar ")
       ' Allow user to end macro with Cancel in InputBox.
       If MyInput = "" Then Exit Sub
       ' Get the date value of the beginning of inputted month.
       StartDay = DateValue(MyInput)
       ' Check if valid date but not the first of the month
       ' -- if so, reset StartDay to first day of month.
       If Day(StartDay) <> 1 Then
           StartDay = DateValue(Month(StartDay) & "/1/" & _
               Year(StartDay))
       End If
       ' Prepare cell for Month and Year as fully spelled out.
       Range("a1").NumberFormat = "mmmm yyyy"
       ' Center the Month and Year label across a1:g1 with appropriate
       ' size, height and bolding.
       With Range("a1:g1")
           .HorizontalAlignment = xlCenterAcrossSelection
           .VerticalAlignment = xlCenter
           .Font.Size = 18
           .Font.Bold = True
           .RowHeight = 35
       End With
       ' Prepare a2:g2 for day of week labels with centering, size,
       ' height and bolding.
       With Range("a2:g2")
           .ColumnWidth = 11
           .VerticalAlignment = xlCenter
           .HorizontalAlignment = xlCenter
           .VerticalAlignment = xlCenter
           .Orientation = xlHorizontal
           .Font.Size = 12
           .Font.Bold = True
           .RowHeight = 20
       End With
       ' Put days of week in a2:g2.
       Range("a2") = "Sunday"
       Range("b2") = "Monday"
       Range("c2") = "Tuesday"
       Range("d2") = "Wednesday"
       Range("e2") = "Thursday"
       Range("f2") = "Friday"
       Range("g2") = "Saturday"
       ' Prepare a3:g7 for dates with left/top alignment, size, height
       ' and bolding.
       With Range("a3:g8")
           .HorizontalAlignment = xlRight
           .VerticalAlignment = xlTop
           .Font.Size = 18
           .Font.Bold = True
           .RowHeight = 21
       End With
       ' Put inputted month and year fully spelling out into "a1".
       Range("a1").Value = Application.Text(MyInput, "mmmm yyyy")
       ' Set variable and get which day of the week the month starts.
       DayofWeek = WeekDay(StartDay)
       ' Set variables to identify the year and month as separate
       ' variables.
       CurYear = Year(StartDay)
       CurMonth = Month(StartDay)
       ' Set variable and calculate the first day of the next month.
       FinalDay = DateSerial(CurYear, CurMonth + 1, 1)
       ' Place a "1" in cell position of the first day of the chosen
       ' month based on DayofWeek.
       Select Case DayofWeek
           Case 1
               Range("a3").Value = 1
           Case 2
               Range("b3").Value = 1
           Case 3
               Range("c3").Value = 1
           Case 4
               Range("d3").Value = 1
           Case 5
               Range("e3").Value = 1
           Case 6
               Range("f3").Value = 1
           Case 7
               Range("g3").Value = 1
       End Select
       ' Loop through range a3:g8 incrementing each cell after the "1"
       ' cell.
       For Each cell In Range("a3:g8")
           RowCell = cell.Row
           ColCell = cell.Column
           ' Do if "1" is in first column.
           If cell.Column = 1 And cell.Row = 3 Then
           ' Do if current cell is not in 1st column.
           ElseIf cell.Column <> 1 Then
               If cell.Offset(0, -1).Value >= 1 Then
                   cell.Value = cell.Offset(0, -1).Value + 1
                   ' Stop when the last day of the month has been
                   ' entered.
                   If cell.Value > (FinalDay - StartDay) Then
                       cell.Value = ""
                       ' Exit loop when calendar has correct number of
                       ' days shown.
                       Exit For
                   End If
               End If
           ' Do only if current cell is not in Row 3 and is in Column 1.
           ElseIf cell.Row > 3 And cell.Column = 1 Then
               cell.Value = cell.Offset(-1, 6).Value + 1
               ' Stop when the last day of the month has been entered.
               If cell.Value > (FinalDay - StartDay) Then
                   cell.Value = ""
                   ' Exit loop when calendar has correct number of days
                   ' shown.
                   Exit For
               End If
           End If
       Next

       ' Create Entry cells, format them centered, wrap text, and border
       ' around days.
       For x = 0 To 5
           Range("A4").Offset(x * 2, 0).EntireRow.Insert
           With Range("A4:G4").Offset(x * 2, 0)
               .RowHeight = 65
               .HorizontalAlignment = xlCenter
               .VerticalAlignment = xlTop
               .WrapText = True
               .Font.Size = 10
               .Font.Bold = False
               ' Unlock these cells to be able to enter text later after
               ' sheet is protected.
               .Locked = False
           End With
           ' Put border around the block of dates.
           With Range("A3").Offset(x * 2, 0).Resize(2, _
           7).Borders(xlLeft)
               .Weight = xlThick
               .ColorIndex = xlAutomatic
           End With

           With Range("A3").Offset(x * 2, 0).Resize(2, _
           7).Borders(xlRight)
               .Weight = xlThick
               .ColorIndex = xlAutomatic
           End With
           Range("A3").Offset(x * 2, 0).Resize(2, 7).BorderAround _
              Weight:=xlThick, ColorIndex:=xlAutomatic
       Next
       If Range("A13").Value = "" Then Range("A13").Offset(0, 0) _
          .Resize(2, 8).EntireRow.Delete
       ' Turn off gridlines.
       ActiveWindow.DisplayGridlines = False
       ' Protect sheet to prevent overwriting the dates.
       ActiveSheet.Protect DrawingObjects:=True, Contents:=True, _
          Scenarios:=True

       ' Resize window to show all of calendar (may have to be adjusted
       ' for video configuration).
       ActiveWindow.WindowState = xlMaximized
       ActiveWindow.ScrollRow = 1

       ' Allow screen to redraw with calendar showing.
       Application.ScreenUpdating = True
       ' Prevent going to error trap unless error found by exiting Sub
       ' here.
       Exit Sub
   ' Error causes msgbox to indicate the problem, provides new input box,
   ' and resumes at the line that caused the error.
   MyErrorTrap:
       MsgBox "You may not have entered your Month and Year correctly." _
           & Chr(13) & "Spell the Month correctly" _
           & " (or use 3 letter abbreviation)" _
           & Chr(13) & "and 4 digits for the Year"
       MyInput = InputBox("Type in Month and year for Calendar")
       If MyInput = "" Then Exit Sub
       Resume
   End Sub
Le code VBA provient de ce site web https://support.microsoft.com/en-us/kb/150774
2. Appuyez sur F5 ou sur le bouton Exécuter, et une boîte de dialogue s’ouvre pour vous demander de saisir le mois spécifique pour lequel vous souhaitez créer un calendrier. Voir la capture d’écran :

3. Cliquez sur OK. Un calendrier de janvier 2015 est désormais créé dans la feuille de calcul actuelle.

Cependant, les méthodes présentées ci-dessus comportent certaines limites. Par exemple, si vous souhaitez créer un calendrier couvrant janvier à mai en une seule fois, vous devrez répéter cinq fois la procédure avec chacune des deux méthodes précédentes. Je vous propose désormais un outil pratique pour résoudre ce problème rapidement et facilement.
Créez facilement un calendrier mensuel ou annuel avec Calendrier perpétuel
Calendrier perpétuel fait partie des utilitaires puissants de Kutools pour Excel et vous permet de créer en un seul clic un calendrier mensuel ou annuel dans Excel.
1. Cliquez sur KUTOOLS PLUS > Feuille de calcul > Calendrier perpétuel.
2. Dans la boîte de dialogue qui s’ouvre, indiquez la période mensuelle pour laquelle vous souhaitez créer le calendrier, puis cliquez sur Créer. Voir la capture d’écran :

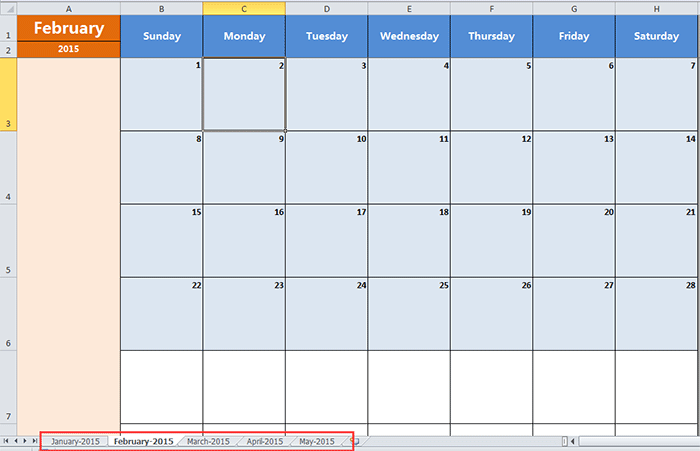
Un nouveau classeur est alors créé, contenant cinq feuilles de calendrier. Voir la capture d’écran :
Astuce :
Si vous souhaitez créer un calendrier pour un seul mois, il vous suffit de sélectionner ce même mois à la fois dans les champs « De » et « À » de la boîte de dialogue.
Cliquez ici pour en savoir plus sur Calendrier perpétuel
Meilleurs outils de productivité Office
Boostez vos compétences Excel avec Kutools pour Excel et découvrez une efficacité inégalée.Kutools pour Excel propose plus de 300 fonctionnalités avancées pour améliorer votre productivité et Gagner du temps.Cliquez ici pour obtenir la fonctionnalité dont vous avez le plus besoin...
Office Tab apporte une interface à onglets à Office et rend votre travail bien plus facile
- Activez l’édition et la lecture par onglets dans Word, Excel, PowerPoint, Publisher, Access, Visio et Project.
- Ouvrez et créez plusieurs documents dans de nouveaux onglets de la même fenêtre, plutôt que dans de nouvelles fenêtres.
- Augmente votre productivité de 50 % et vous fait économiser des centaines de clics de souris chaque jour !
Tous les compléments Kutools. Un seul installateur
Kutools for Office regroupe les compléments pour Excel, Word, Outlook et PowerPoint, ainsi que Office Tab Pro, ce qui en fait le choix idéal pour les équipes travaillant à travers les applications Office.
- Suite tout-en-un— Compléments Excel, Word, Outlook et PowerPoint + Office Tab Pro
- Un seul installateur, une seule licence— installation en quelques minutes (compatible MSI)
- Fonctionne mieux ensemble— productivité optimisée dans toutes les applications Office
- Essai gratuit de 30 jours avec toutes les fonctionnalités— aucune inscription, aucune carte bancaire
- Meilleur rapport qualité-prix— économisez par rapport à l’achat de compléments individuels