Comment créer un calendrier dans Excel ?
Un calendrier Excel vous permet de suivre facilement les événements clés, comme le début d’un nouveau poste ou la date limite de livraison d’un élément, en les rendant clairs et immédiatement accessibles. Dans ce guide, découvrez comment créer des calendriers mensuels et annuels directement dans Excel. Vous apprendrez à utiliser des modèles pour une mise en place rapide, mais aussi à concevoir un calendrier entièrement personnalisé si vous souhaitez un contrôle total. Restez ainsi parfaitement organisé, tant dans votre vie professionnelle que personnelle.

Créez un calendrier annuel à l’aide des modèles de calendrier Excel
Créez rapidement un calendrier mensuel ou annuel avec Kutools pour Excel
Créez un calendrier annuel à l’aide des modèles de calendrier Excel
Avec cette méthode, assurez-vous que votre ordinateur est connecté au réseau pour pouvoir télécharger les modèles de calendrier.
1. Accédez à l’onglet Fichier, cliquez sur le bouton Nouveau dans le volet gauche, puis cliquez sur Calendriers sous Recherches suggérées. Voir la capture d’écran :

2. Choisissez le modèle de calendrier qui vous plaît et double-cliquez dessus pour créer votre calendrier annuel.

Résultat
Créez rapidement un calendrier mensuel ou annuel avec Kutools pour Excel
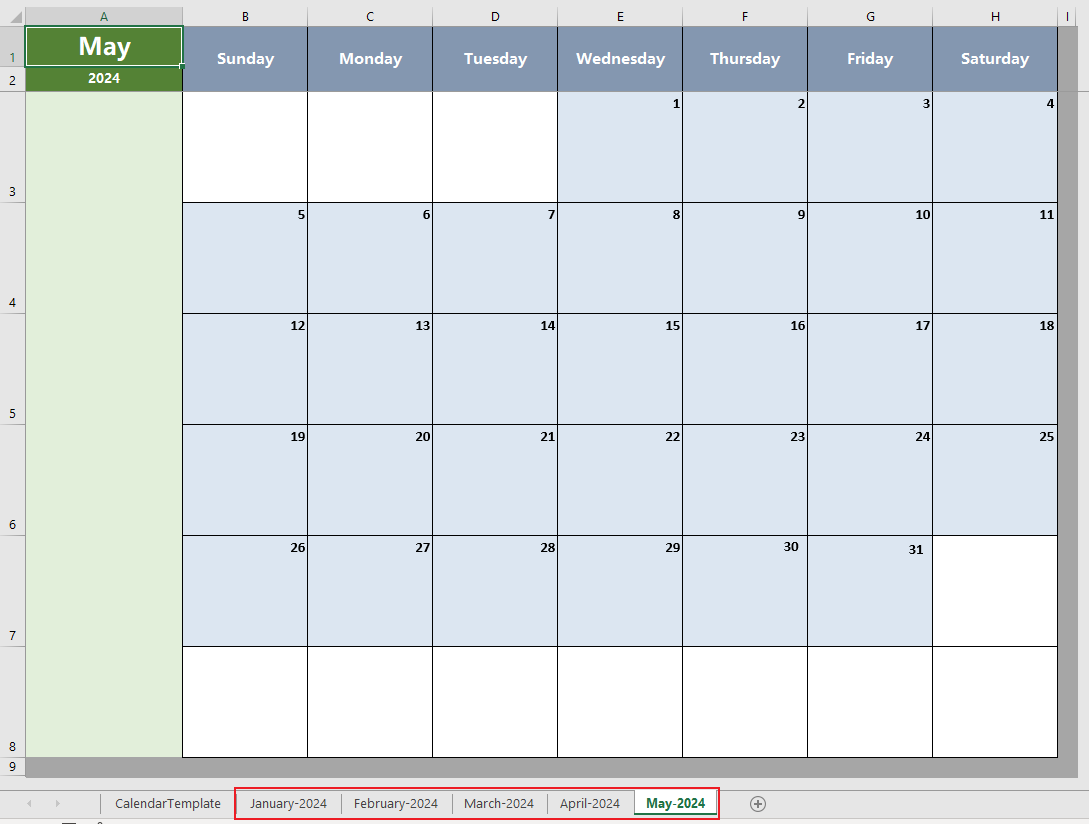
Le calendrier perpétuel de Kutools pour Excel vous permet de créer rapidement un calendrier personnalisé, mensuel ou annuel, dans un nouveau classeur, chaque calendrier mensuel étant placé dans une nouvelle feuille de calcul.
Après avoir installé Kutools pour Excel, cliquez sur KUTOOLS PLUS > Feuille de calcul > Calendrier perpétuel. Dans la boîte de dialogue Calendrier perpétuel qui s’ouvre, procédez comme suit :
- Pour créer un calendrier mensuel, sélectionnez les mois souhaités à l’aide des listes déroulantes De et À, puis cliquez sur Créer.
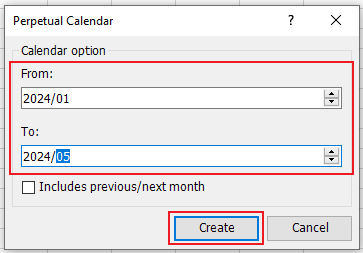
- Pour créer un calendrier annuel, indiquez l’année souhaitée à l’aide des listes déroulantes De et À, puis cliquez sur Créer.

Résultat
- Un calendrier mensuel :
- Un calendrier annuel :

Créez un calendrier mensuel avec du code VBA
Grâce au code VBA ci-dessous, créez rapidement un calendrier mensuel en suivant ces étapes :
1. Appuyez sur les touches Alt + F11 pour ouvrir la fenêtre Microsoft Visual Basic pour Applications.
2. Une nouvelle fenêtre s’affiche. Cliquez sur Insertion > Module, puis saisissez le code suivant dans le module :
 Sub CalendarMaker()
ActiveSheet.Protect DrawingObjects:=False, Contents:=False, _
Scenarios:=False
Application.ScreenUpdating = False
On Error GoTo MyErrorTrap
Range("a1:g14").Clear
MyInput = InputBox("Type in Month and year for Calendar ")
If MyInput = "" Then Exit Sub
StartDay = DateValue(MyInput)
If Day(StartDay) <> 1 Then
StartDay = DateValue(Month(StartDay) & "/1/" & _
Year(StartDay))
End If
Range("a1").NumberFormat = "mmmm yyyy"
With Range("a1:g1")
.HorizontalAlignment = xlCenterAcrossSelection
.VerticalAlignment = xlCenter
.Font.Size = 18
.Font.Bold = True
.RowHeight = 35
End With
With Range("a2:g2")
.ColumnWidth = 11
.VerticalAlignment = xlCenter
.HorizontalAlignment = xlCenter
.VerticalAlignment = xlCenter
.Orientation = xlHorizontal
.Font.Size = 12
.Font.Bold = True
.RowHeight = 20
End With
Range("a2") = "Sunday"
Range("b2") = "Monday"
Range("c2") = "Tuesday"
Range("d2") = "Wednesday"
Range("e2") = "Thursday"
Range("f2") = "Friday"
Range("g2") = "Saturday"
With Range("a3:g8")
.HorizontalAlignment = xlRight
.VerticalAlignment = xlTop
.Font.Size = 18
.Font.Bold = True
.RowHeight = 21
End With
Range("a1").Value = Application.Text(MyInput, "mmmm yyyy")
DayofWeek = Weekday(StartDay)
CurYear = Year(StartDay)
CurMonth = Month(StartDay)
FinalDay = DateSerial(CurYear, CurMonth + 1, 1)
Select Case DayofWeek
Case 1
Range("a3").Value = 1
Case 2
Range("b3").Value = 1
Case 3
Range("c3").Value = 1
Case 4
Range("d3").Value = 1
Case 5
Range("e3").Value = 1
Case 6
Range("f3").Value = 1
Case 7
Range("g3").Value = 1
End Select
For Each cell In Range("a3:g8")
RowCell = cell.Row
ColCell = cell.Column
If cell.Column = 1 And cell.Row = 3 Then
ElseIf cell.Column <> 1 Then
If cell.Offset(0, -1).Value >= 1 Then
cell.Value = cell.Offset(0, -1).Value + 1
If cell.Value > (FinalDay - StartDay) Then
cell.Value = ""
Exit For
End If
End If
ElseIf cell.Row > 3 And cell.Column = 1 Then
cell.Value = cell.Offset(-1, 6).Value + 1
If cell.Value > (FinalDay - StartDay) Then
cell.Value = ""
Exit For
End If
End If
Next
For x = 0 To 5
Range("A4").Offset(x * 2, 0).EntireRow.Insert
With Range("A4:G4").Offset(x * 2, 0)
.RowHeight = 65
.HorizontalAlignment = xlCenter
.VerticalAlignment = xlTop
.WrapText = True
.Font.Size = 10
.Font.Bold = False
.Locked = False
End With
With Range("A3").Offset(x * 2, 0).Resize(2, _
7).Borders(xlLeft)
.Weight = xlThick
.ColorIndex = xlAutomatic
End With
With Range("A3").Offset(x * 2, 0).Resize(2, _
7).Borders(xlRight)
.Weight = xlThick
.ColorIndex = xlAutomatic
End With
Range("A3").Offset(x * 2, 0).Resize(2, 7).BorderAround _
Weight:=xlThick, ColorIndex:=xlAutomatic
Next
If Range("A13").Value = "" Then Range("A13").Offset(0, 0) _
.Resize(2, 8).EntireRow.Delete
ActiveWindow.DisplayGridlines = False
ActiveSheet.Protect DrawingObjects:=True, Contents:=True, _
Scenarios:=True
ActiveWindow.WindowState = xlMaximized
ActiveWindow.ScrollRow = 1
Application.ScreenUpdating = True
Exit Sub
MyErrorTrap:
MsgBox "You may not have entered your Month and Year correctly." _
& Chr(13) & "Spell the Month correctly" _
& " (or use 3 letter abbreviation)" _
& Chr(13) & "and 4 digits for the Year"
MyInput = InputBox("Type in Month and year for Calendar")
If MyInput = "" Then Exit Sub
Resume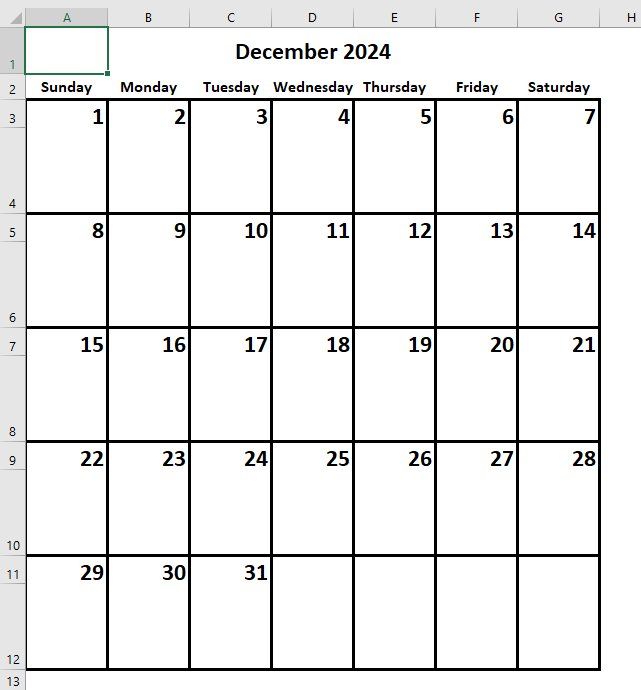
End Sub 3. Cliquez ensuite sur le bouton Exécuter ou appuyez sur la touche F5 pour exécuter l’application. Une boîte de dialogue s’affiche alors ; saisissez le mois et l’année dans le champ prévu à cet effet.

Résultat
Articles associés
Comment créer un calendrier sous forme de liste déroulante (sélecteur de date) dans Excel ?
Grâce à un calendrier déroulant dans votre feuille Excel, sélectionnez une date précise en un clic — sans saisie manuelle ! Ce tutoriel vous explique pas à pas comment intégrer un calendrier à l’aide d’un contrôle ActiveX.
Comment faire apparaître un calendrier en cliquant sur une cellule spécifique dans Excel ?
Découvrez comment afficher un calendrier au clic sur les cellules d’une plage définie et insérer automatiquement la date sélectionnée directement dans la cellule concernée.
Comment créer un rendez-vous à partir d’une feuille Excel vers le calendrier Outlook ?
Il arrive parfois que vous deviez créer des rendez-vous dans le calendrier Outlook. Mais avez-vous déjà envisagé de les lister d’abord dans une feuille Excel, puis de les importer directement dans votre calendrier Outlook, comme illustré ci-dessous ?
Comment créer un calendrier mensuel dynamique dans Excel ?
Découvrez dans cet article une méthode détaillée pour créer un calendrier mensuel dynamique dans Excel.
Les meilleurs outils de productivité Office
Kutools pour Excel – Vous permet de vous démarquer de la foule
Kutools pour Excel propose plus de 300 fonctionnalités,garantissant que ce dont vous avez besoin se trouve à portée de clic...
Office Tab – Active la lecture et l’édition avec onglets dans Microsoft Office (y compris Excel)
- Passez d’un document à l’autre en une seconde parmi des dizaines de documents ouverts !
- Réduisez de centaines de clics de souris chaque jour et dites adieu au syndrome du poignet de la souris.
- Augmente votre productivité de 50 % lorsque vous visualisez et modifiez plusieurs documents.
- Apporte une efficacité de type navigateur à Office (y compris Excel), tout comme Chrome, Edge et Firefox.