Comment créer des rappels Outlook à partir d’une feuille de calcul Excel ?
Cet article explique comment créer des rappels Outlook à partir des données d’une feuille de calcul Excel.
Créer des rappels Outlook à partir d’une feuille de calcul Excel avec du code VBA
Créer des rappels Outlook à partir d’une feuille de calcul Excel avec du code VBA
Pour créer des rappels Outlook à partir d’Excel, suivez ces étapes.
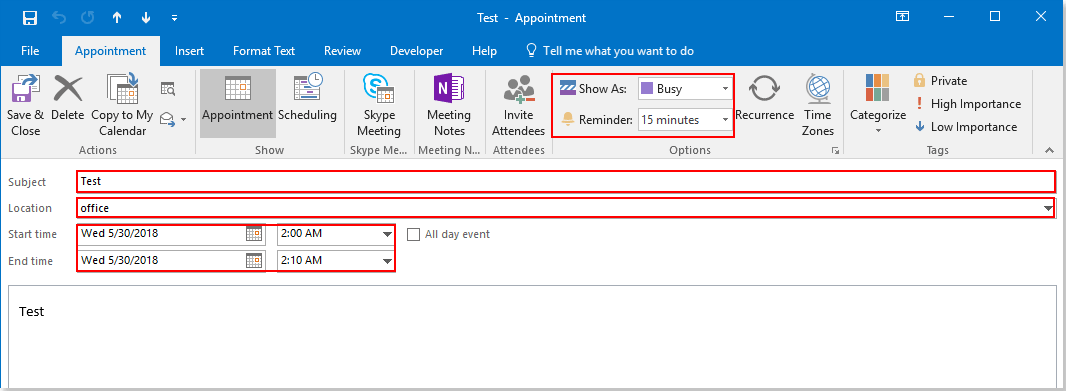
1. Créez une feuille de calcul comprenant les en-têtes de colonnes et les champs de rappel correspondants, comme le montre la capture d’écran ci-dessous.

Remarque : dans la colonne « Statut d’occupation », le chiffre « 2 » fait apparaître le rappel comme « Occupé » dans votre calendrier Outlook. Vous pouvez le remplacer par « 1 (Provisoire) », « 3 (Absent du bureau) », « 4 (Travail ailleurs) » ou « 5 (Libre) » selon vos besoins.
2. Appuyez sur les touches « Alt » + « F11 » pour ouvrir la fenêtre « Microsoft Visual Basic pour Applications ».
3. Dans la fenêtre « Microsoft Visual Basic pour Applications », cliquez sur « Insertion » > « Module », puis copiez le code VBA suivant dans la fenêtre de code.
Code VBA : Créer des rappels Outlook à partir d’une feuille de calcul Excel
Sub AddAppointments()
'Update by Extendoffice 20180608
    Dim I As Long
    Dim xRg As Range
    Dim xOutApp As Object
    Dim xOutItem As Object
    Set xOutApp = CreateObject("Outlook.Application")
    Set xRg = Range("A2:G2")
    For I = 1 To xRg.Rows.Count
        Set xOutItem = xOutApp.CreateItem(1)
        Debug.Print xRg.Cells(I, 1).Value
        xOutItem.Subject = xRg.Cells(I, 1).Value
        xOutItem.Location = xRg.Cells(I, 2).Value
        xOutItem.Start = xRg.Cells(I, 3).Value
        xOutItem.Duration = xRg.Cells(I, 4).Value
        If Trim(xRg.Cells(I, 5).Value) = "" Then
            xOutItem.BusyStatus = 2
        Else
            xOutItem.BusyStatus = xRg.Cells(I, 5).Value
        End If
        If xRg.Cells(I, 6).Value > 0 Then
            xOutItem.ReminderSet = True
            xOutItem.ReminderMinutesBeforeStart = xRg.Cells(I, 6).Value
        Else
            xOutItem.ReminderSet = False
        End If
        xOutItem.Body = xRg.Cells(I, 7).Value
        xOutItem.Save
        Set xOutItem = Nothing
    Next
    Set xOutApp = Nothing
End Sub
Remarque : dans le code ci-dessus, « A2:G2 » correspond à la plage de données à partir de laquelle vous souhaitez créer des rendez-vous.
4. Appuyez sur « F5 » ou cliquez sur le bouton « Exécuter » pour lancer le code : tous les rendez-vous comportant les champs spécifiés seront alors ajoutés en un seul clic à votre calendrier Outlook.
Vous pourrez ensuite accéder au calendrier de votre Outlook afin de visualiser les résultats. Voir la capture d’écran :
Meilleurs outils de productivité Office
Découvrez la toute nouvelle Kutools pour Outlook avec 100+ fonctionnalités incroyables !Cliquez pour télécharger dès maintenant !
📧Automatisation des e-mails : Réponse automatique (disponible pour POP et IMAP) / Planification de l’envoi d’e-mails / CC/BCC automatique selon des règles lors de l’envoi d’e-mails / Transfert automatique (règle avancée) / Ajout automatique de formules de politesse / Division automatique des e-mails à plusieurs destinataires en messages individuels...
📨Gestion des e-mails : Rappeler un e-mail / Bloquer les e-mails frauduleux par objet et autres critères / Supprimer les e-mails en double / Recherche avancée / Organiser vos dossiers…
📁Pièces jointes Pro : Enregistrer en lot / Détacher en lot / Compresser en lot / Enregistrement automatique / Détachement automatique / Compression automatique…
🌟Magie de l’interface : 😊 Encore plus d’emojis jolis et stylés / Vous prévient à l’arrivée d’e-mails importants / Réduire Outlook au lieu de le fermer...
👍Merveilles en un clic : Répondre à tous avec pièces jointes / E-mails anti-hameçonnage / 🕘 Afficher le fuseau horaire – Heure actuelle de l’expéditeur…
👩🏼🤝👩🏻Contacts et calendrier : Créer en lot : ajouter un contact à partir des e-mails sélectionnés / Diviser un groupe de contacts en groupes individuels / Supprimer le rappel d’anniversaire…
Utilisez Kutools dans votre langue préférée – compatible avec l’anglais, l’espagnol, l’allemand, le français, le chinois et plus de 40 autres langues !


🚀 Téléchargement en un clic — Obtenez tous les compléments Office
Fortement recommandé : Kutools for Office (5-en-1)
Un seul clic pour télécharger cinq programmes d’installationen une fois —Kutools pour Excel, Outlook, Word, PowerPointet Office Tab Pro.Cliquez pour télécharger dès maintenant !
- ✅Commodité en un clic : téléchargez les cinq packs d’installation en une seule action.
- 🚀Prêt à relever toutes vos tâches Office : installez les compléments dont vous avez besoin, exactement quand vous en avez besoin.
- 🧰Inclus: Kutools pour Excel / Kutools pour Outlook / Kutools pour Word / Office Tab Pro / Kutools for PowerPoint